Quick Getting Started Guide to HKWHub App
Quick Getting Started Guide to HKWHub App
Overview of HKWHubApp
Note
You can download the HKWHub app from App Store (click here)
Main Screen
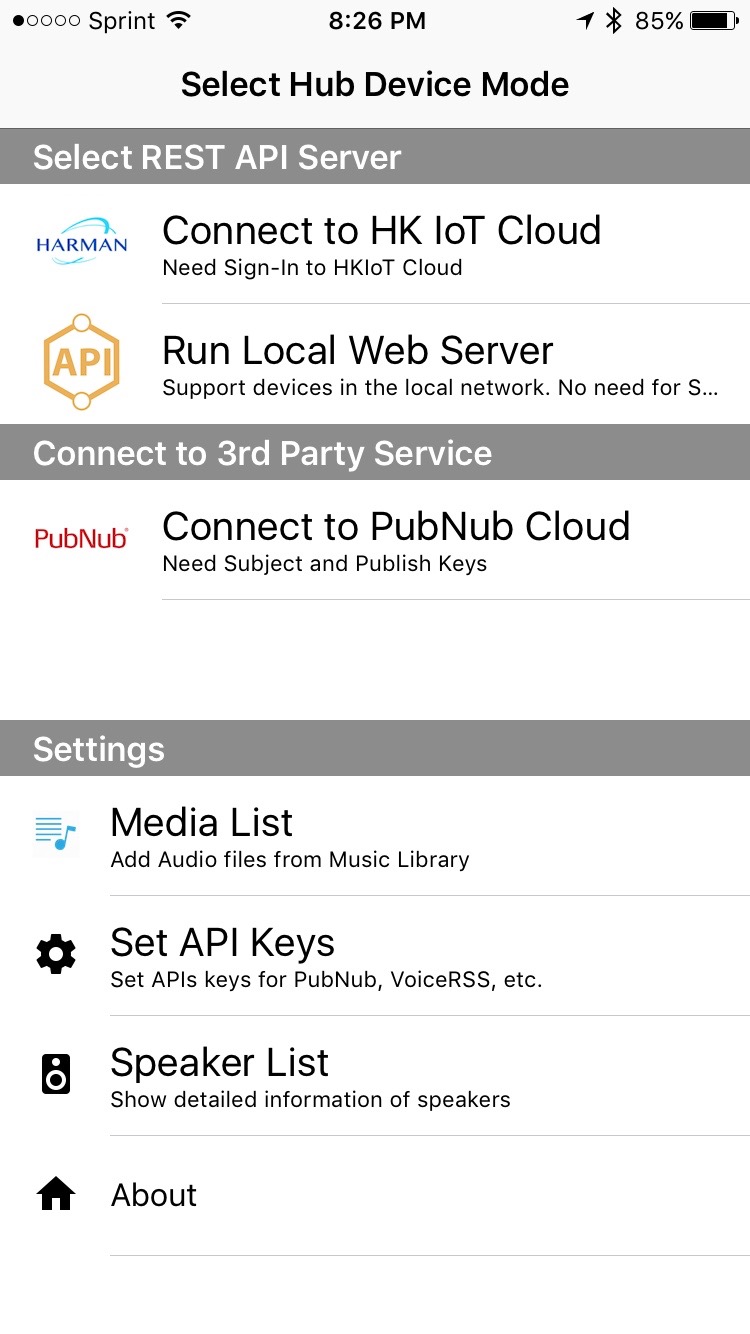
The main screen is composed of two parts - Select Server mode (amonng HKIoTCloud, Local Server and PubNub Cloud), and Settings.
The Select Server mode has three options:
- Connect to HK IoT Cloud
- HKWHub app connects to HKIotCloud, and communicate with it with WebSocket to receive REST API commands from and send the responses back to the Cloud.
- Run Local Web Server
- HKWHub app runs a local web server and processes incoming REST requests to control speakers and playback of audio
- Connect to PubNub Cloud
- HKWHub app uses PubNub APIs to connect PubNub server and communicate with other PubNub client through a common channel.
The Settings menu has four sub menus:
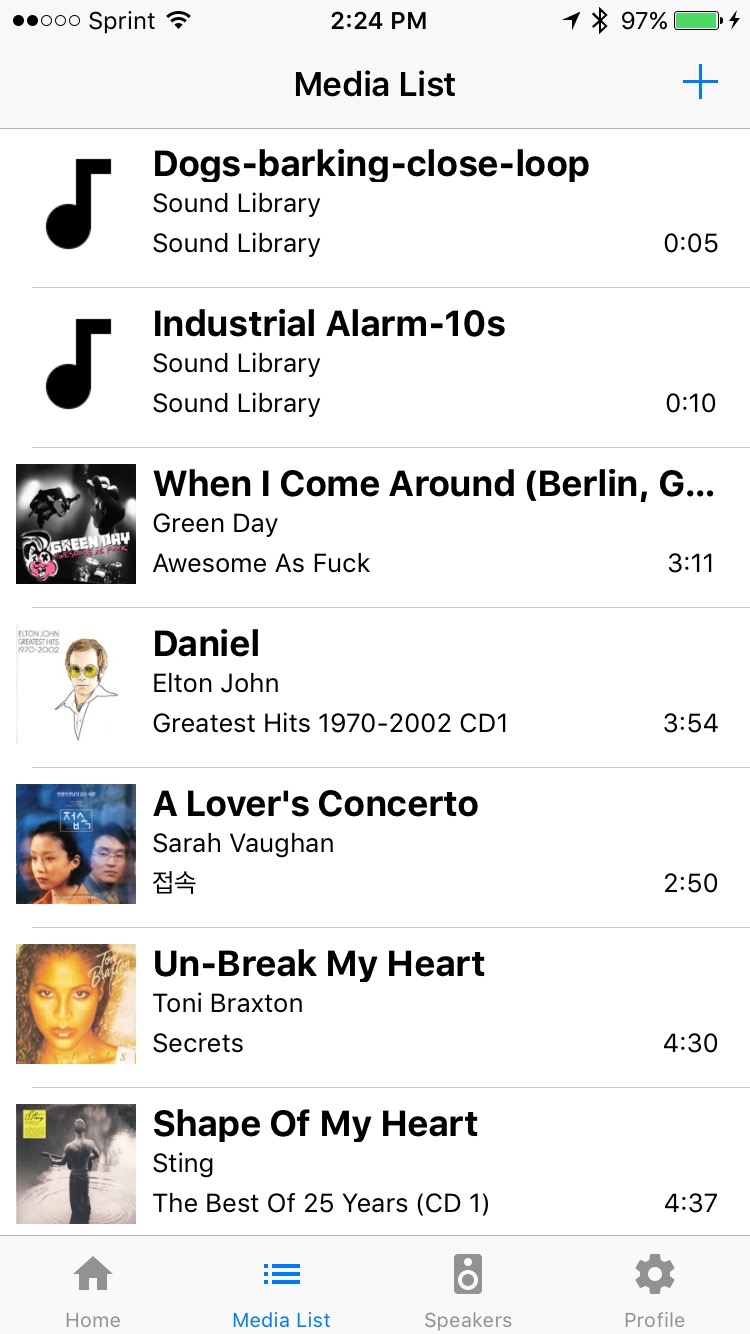
- Media List
- User can maintain the list of audio files for audio playback.
- User can add audio from iOS Media Library.
Note
Note that only the media file available offline and not from Apple Musica can be added. The music file that came from Apple Music cannot be added by DRM issue.
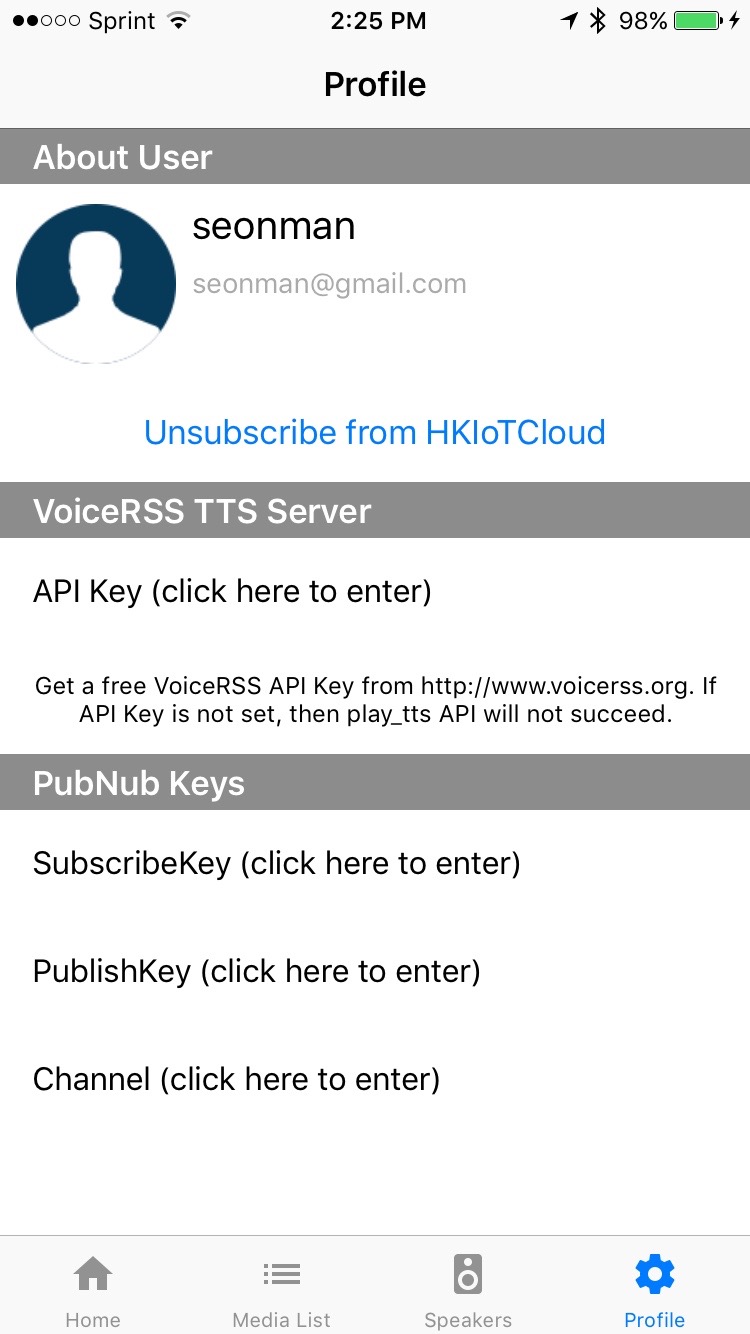
- Set API Keys
- To use PubNub mode, user needs to enter PubNub API keys. It requires Publish Key and Subscribe Key. And also, user needs to set the channel where it exchanges the command and events with other clients.
- If user (or developer) wants to use TTS APIs such as play_tts, then user needs to enter VoiceRSS (http://www.voicerss.org) API keys. You can get a free API key.
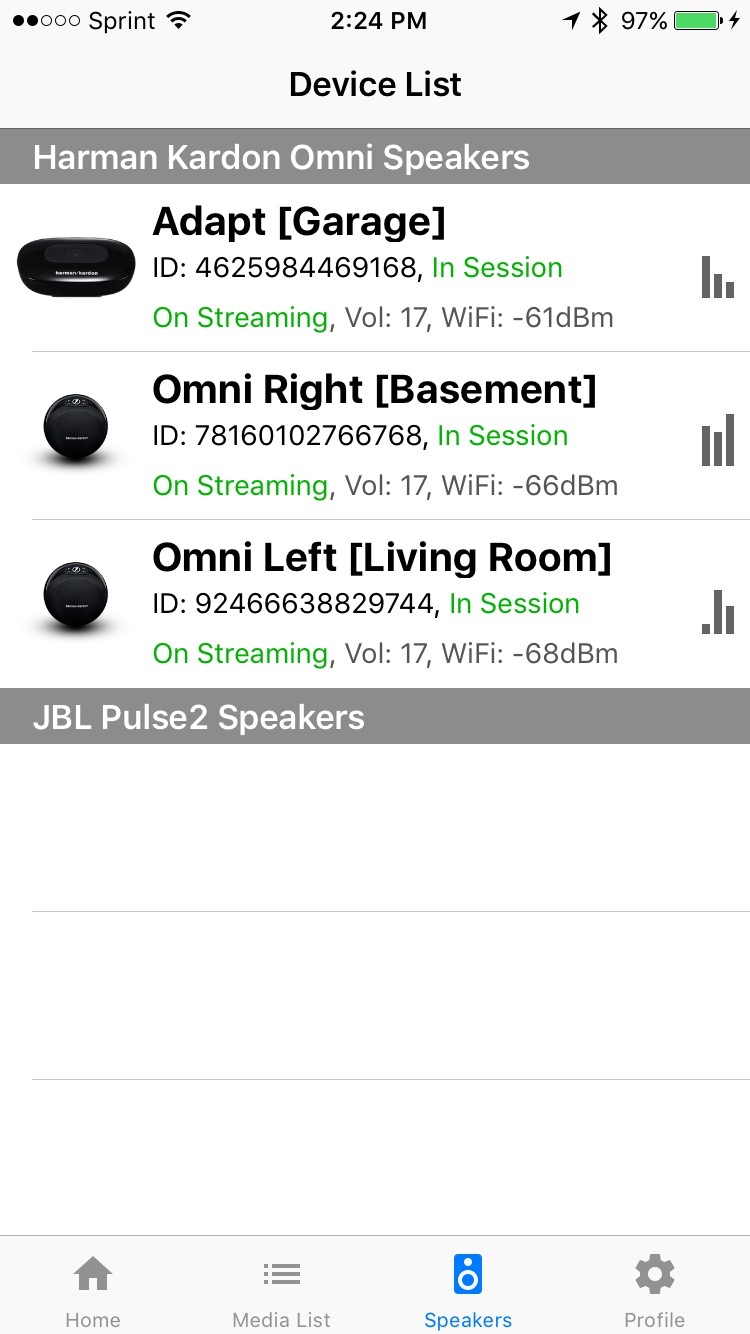
- Speaker List
- You can see the list of speakers available in the current local network.
- You can also change the device name or group name from this screen.
- About
- The information of the app and the links to Harman developer documentation site.
From now on, we will explain a little more detail about each server mode.
HKIoTCloud Mode
Connecting to HKIoTCloud
In HKIoTCloud demo, 3rd party clients can connect to HKIoTCloud (http://hkiotcloud.azurewebsites.net) and send REST requests to control speakers and play audio. In order to use HKIoTCloud mode, user needs to sign up to the cloud with username, emaill address and password. Once sign up is done, user need to sign in to the server. User sign-up and sign-in can be done within the HKWHub app, as shown below.
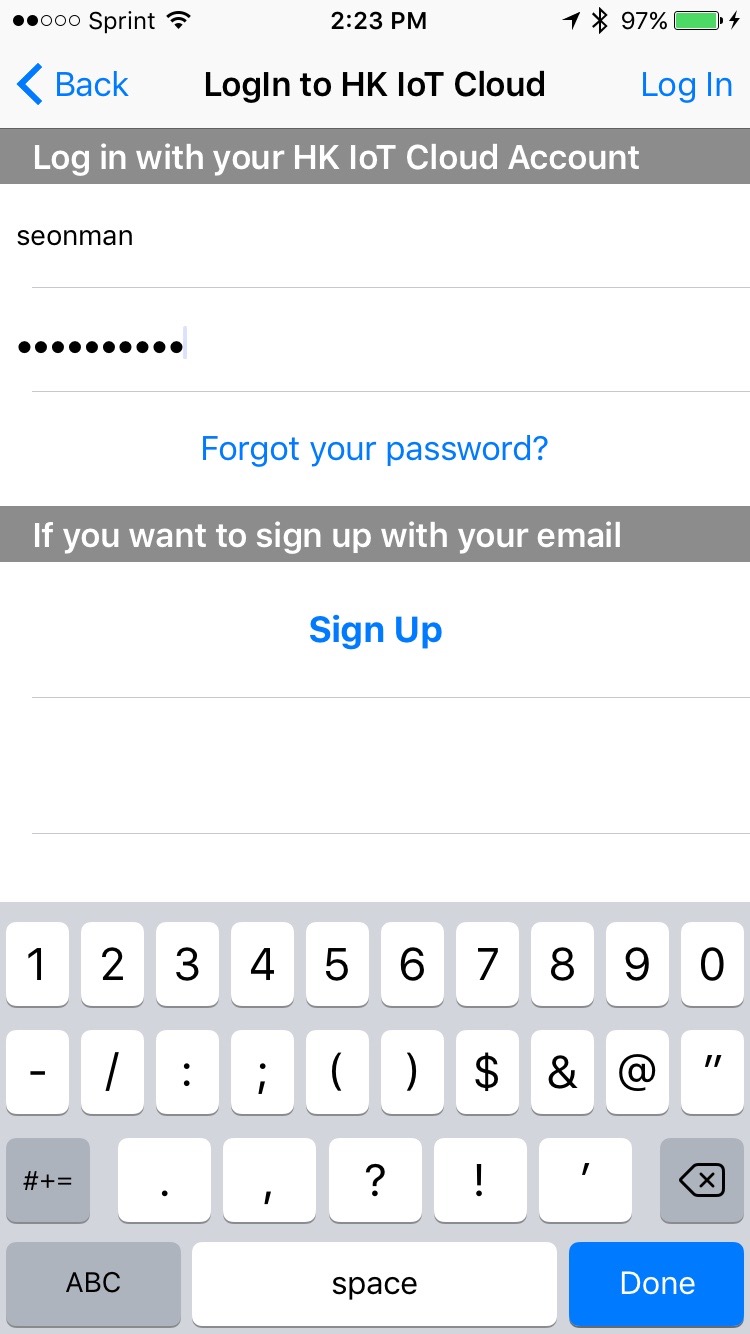
Once the HKWHub app successfully signs in to HKIoTCloud, the screen will be switched to Log screen, like shown as below. You can see all the message logs received from or sent to the cloud. Each log contains a JSON data, so you can see what information is being sent and received between the server.
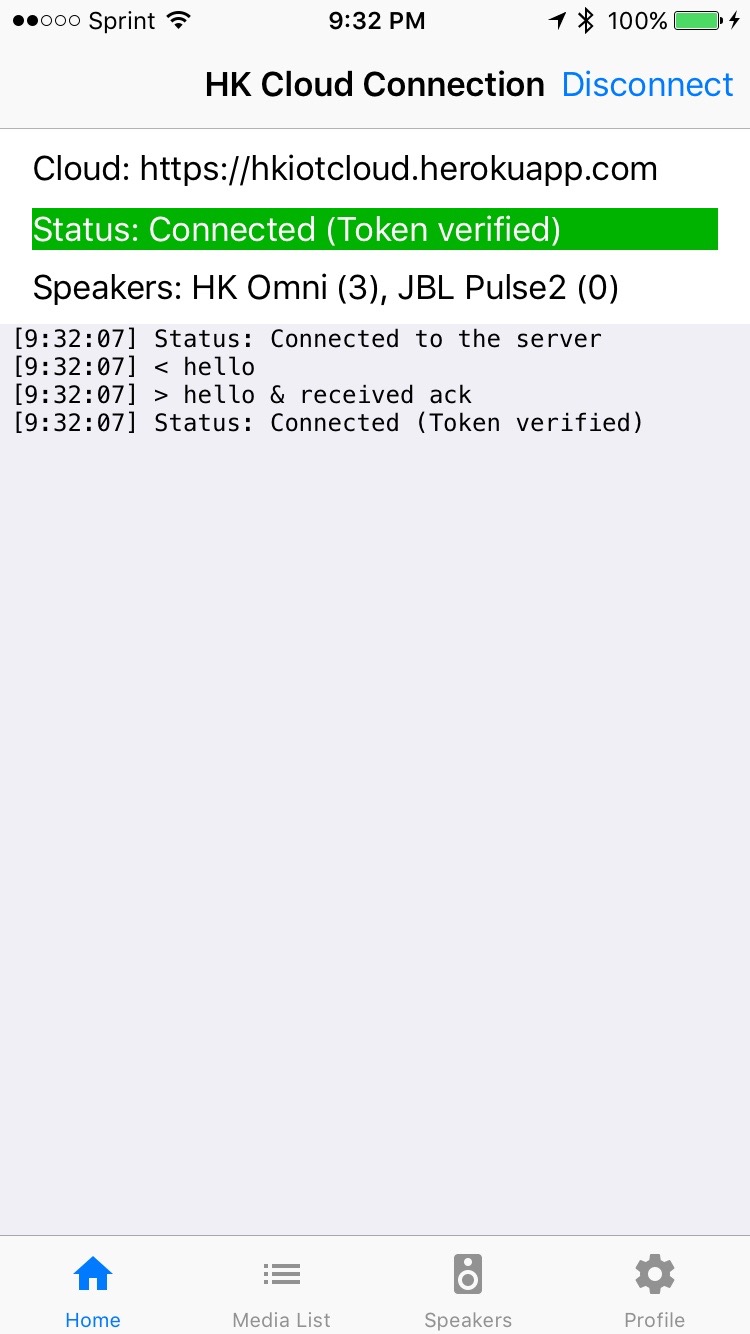
If you want to disconnect the server and return to the main screen, press Disconnect button on the top righthand corner.
Sending REST Requests to HKIoTCloud
Once the HKWHub App is running, you can now connect a client to HKIoTCloud and send REST requests to the server. We will explain about the REST APIs supported with a little more detailed example of curl commands in the next section.
Note
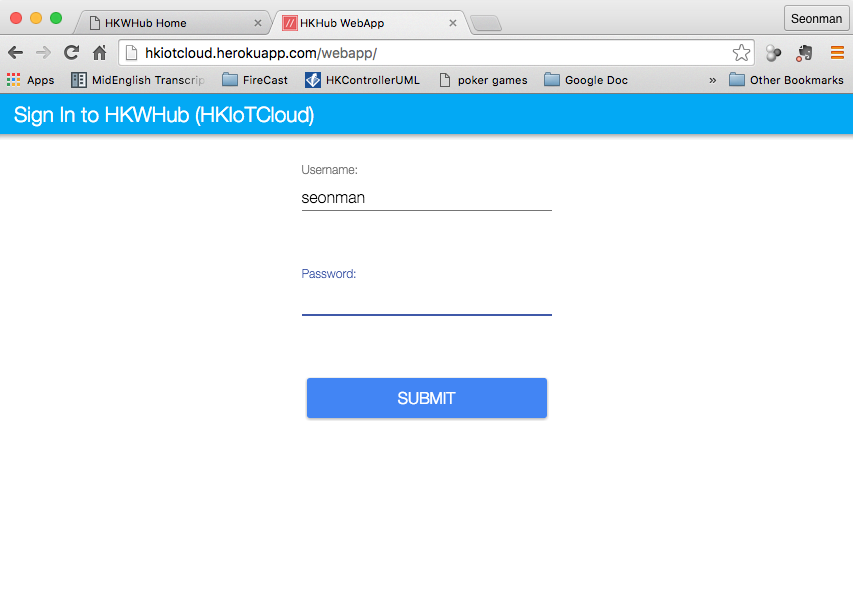
For a client to connect to HKIoTCloud, the same username and password are required.
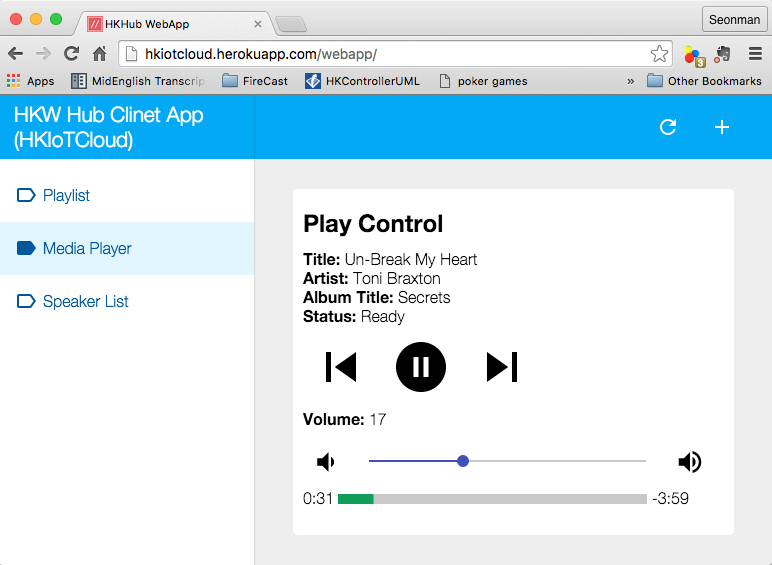
As an example of client, HKIoTCloud hosts a Web-based client app, at http://hkiotcloud.azurewebsites.net/webapp/. The following is a screenshot of the web app.
Once user authentication is done successfully, the Web app will switch the screen to the Playlist screen.
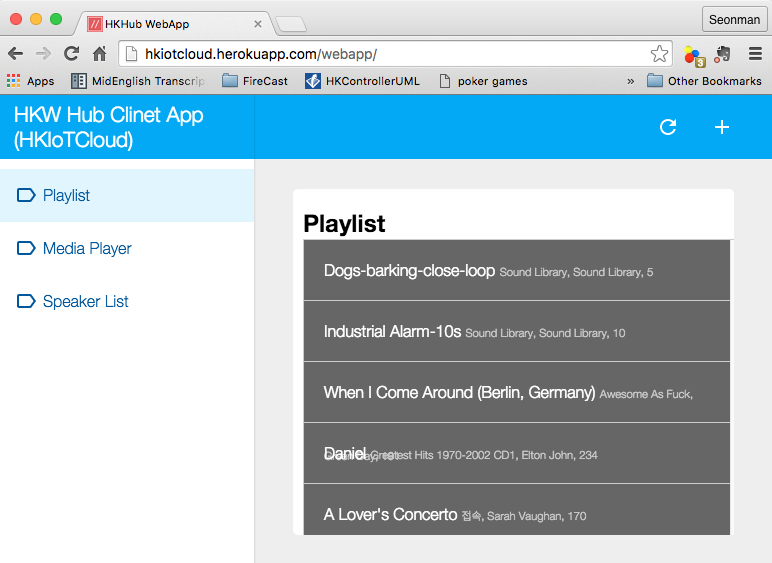
Now, you can click one of the titles in the list, and see how the web app is playing the title, showing the information of the title, volume, and playback time, and so on.
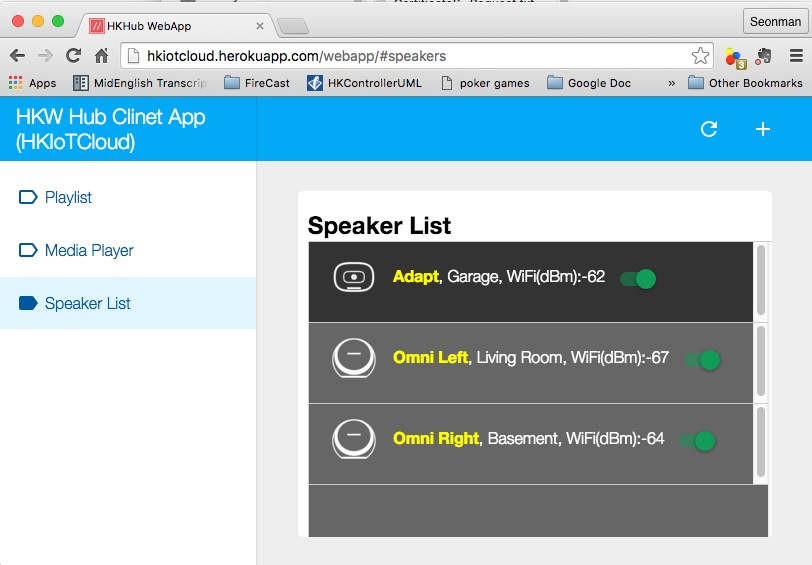
If you click Speaker List menu on the left, you can see more detailed information of speakers like below, and can control speakers, like remove a speaker from the current playback session or add a speaker to playback.
Local Server Mode
Running Local Server
Loca Server Mode is almost the same as HKIoTCloud, except that HKWHub app runs a web server inside, instead connecting to HKIoTCloud. Therefore, HKWHub app can receive REST requests directly from clients in the same network. If you want to connect speakers from any type of devices in the same local network, then Local Server mode can be easier solution.
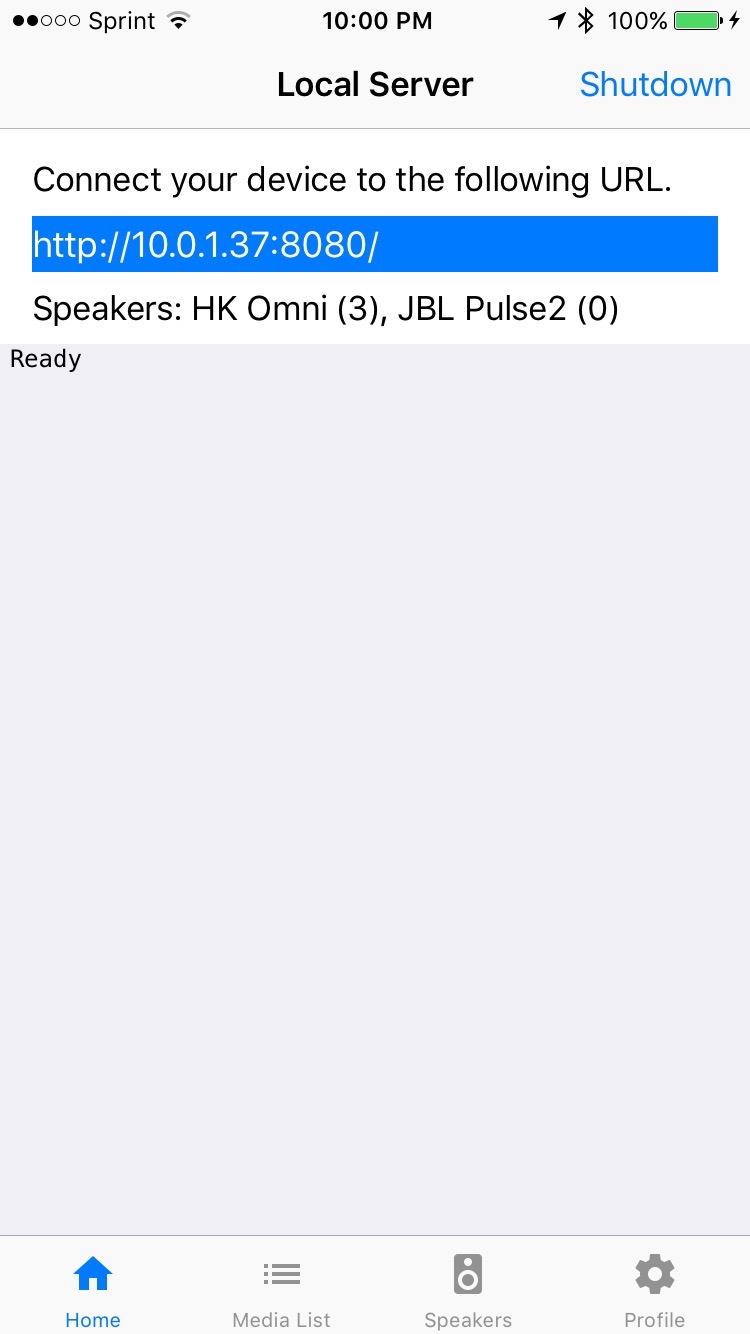
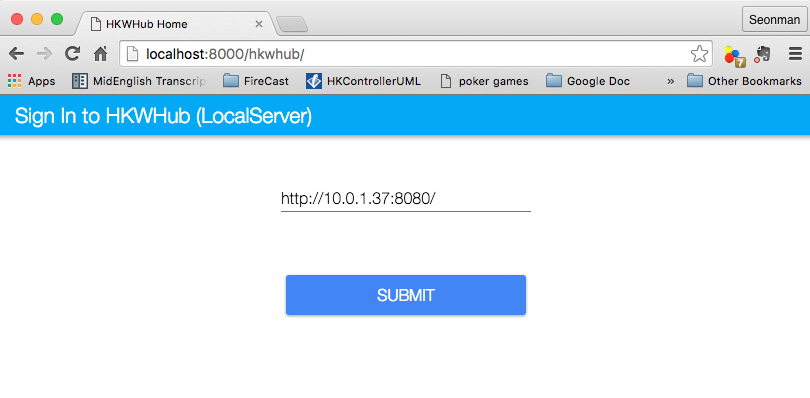
Once you click Run Local Web Server menu, then you will see the following screen. From the screen, you can see a URL indicating where a client should connect to. In this example, the client should enter the URL http://10.0.1.37:8080/ followed by REST command and parameters.
The RESI APIs are almost the same as the ones of HKIoTCloud mode.
Sending REST Requests to LocalServer
As a sample client app, you can use WebHubWebApp that you can download from Harman Developer web site (http://developer.harman.com) or direclty from here. The Web app is created using Polymer v0.5 (https://www.polymer-project.org/0.5/).
Once you download the app, unzip it. You will see the following sub directories.
- bower_components: THis is the folder where polymer libraries are located.
- hkwhub: this is the folder containing the WebHubApp source code.
$ cd WebHubWebApp
$ python -m SimpleHTTPServer
You will get some log messages like “Serving HTTP on 0.0.0.0 port 8000 ...”
Next, launch your web browser (Chrome, Safari, ...) and go to http://localhost:8000/hkwhub/
Note
Your iOS device running HKWHub app and your Desktop PC running web browser should be in the same network.
At the fist screen looking like this:
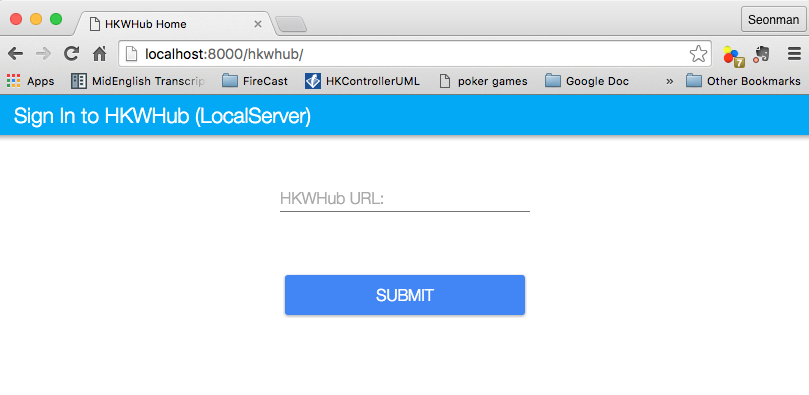
Enter the URL that the HKWHub app says: http://10.0.1.37:8080/, like this:
If you press Submit, then you will see the first screen like below. This is the list of media items available at the HKWHub app.

The UI of the Web app is exactly the same as HKIoTCloud web app. So, we skip to explain the rest parts of the app.
PubNub Server Mode
Connect to PubNub Server
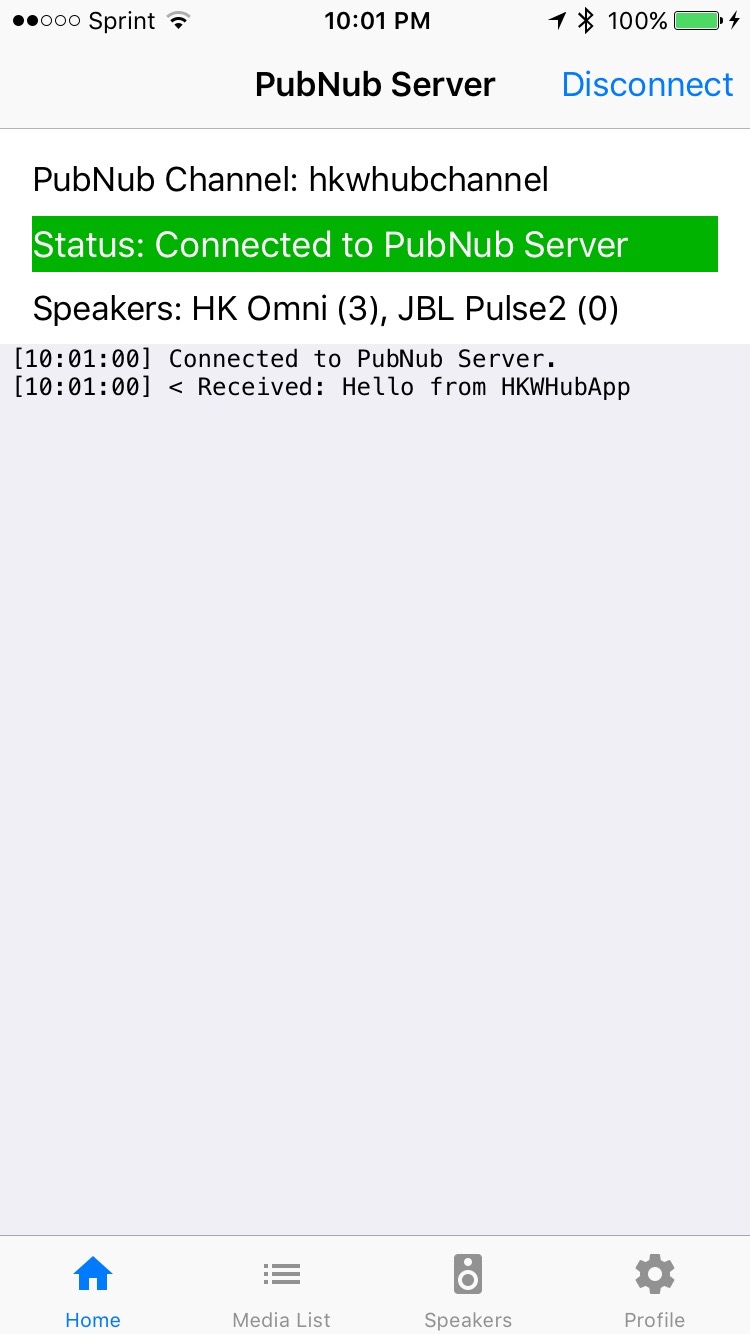
With PubNub server mode, any PubNub client can connect to and control Omni speakes managed by HKWHub app. Just click Connect to PubNub Cloud menu in the main screen, then you will see the screen like below. Please check if the logs are saysing something like “Received: Hello from HKWHubApp” which is the message sent back from PubNub server after the HKWHub app published the message. This means the app is now connected to PubNub cloud.
Differently from HKIoTCloud or Local Server mode that relies on REST API for control and playback of speakers, PubNub is using Publish/Subscribe messaging instead. And in order to route the message among clients, we should set PubNub Channel so that all the published messages are correctly routed to subscribed clients of the same channel.
So, for HKWHub app successfully connects to PubNub cloud, user needs to set PubNub Publish Key, Subscribe Key, and Channel. As explained already, user can set these keys in the Settings/Set API Keys menu in the main screen.
Sending REST Requests to PubNub Cloud
Once the HKWHub app is connected to PubNub cloud, a PubNub client can send PubNub message. Even though it does not use REST API, but use PubNub’s Subscribe/Publish messaging instead, the content of the messages are almost the same as the REST APIs, and it is in JSON format.
Note
One biggest difference between REST API and Publish/Subscribe messaging is that Pub/Sub messaging does not need to do Polling for getting information from the server when an event occurs on the server side, because REST API does not support callback mechanism to notify an event to clients. However, Pub/Sub messaging is bidirectional, the client can get notified immediately from the server. Either client or server can publish a message to the channel being shared to notify an event to subsribers.
In this reason, the messages of request and response for speaker control are a littke different. For a client to send a command to speaker, the client publish the command to the channel. Then because HKWHub app is one of the clients, it receives the command, and process the command internally. If the command requires a response, then HKWHub app should send the response back to the client. To to that, HKWHub app also needs to publish the response to the channel. And, the client will get the response because it subscribed to the channel.
If HKWHub app has some event to report to notify to clients, for example, device status changed, or playback time changed, etc., then HKWHub app publish the events to the channel, then all the client listening to the channel will receive the event.
Sample Web App
As a sample client app, you can use WebHubPubNubApp that you can download from Harman Developer web site (http://developer.harman.com) or directly from here.. Likewise, The Web app is created using Polymer v0.5 (https://www.polymer-project.org/0.5/).
Once you download the app, unzip it. You will see the following sub directories.
- bower_components: THis is the folder where polymer libraries are located.
- hkwhub: this is the folder containing the WebHubApp source code.
$ cd WebHubPubNubApp
$ python -m SimpleHTTPServer
You will get some log messages like “Serving HTTP on 0.0.0.0 port 8000 ...”
Next, launch your web browser (Chrome, Safari, ...) and go to http://localhost:8000/hkwhub/
Note
Your iOS device running HKWHub app and your Desktop PC running web browser should be in the same network.
At the fist screen looking like below. Note that it looks different from the screen from Local Server mode, which requires only URL of the web server.
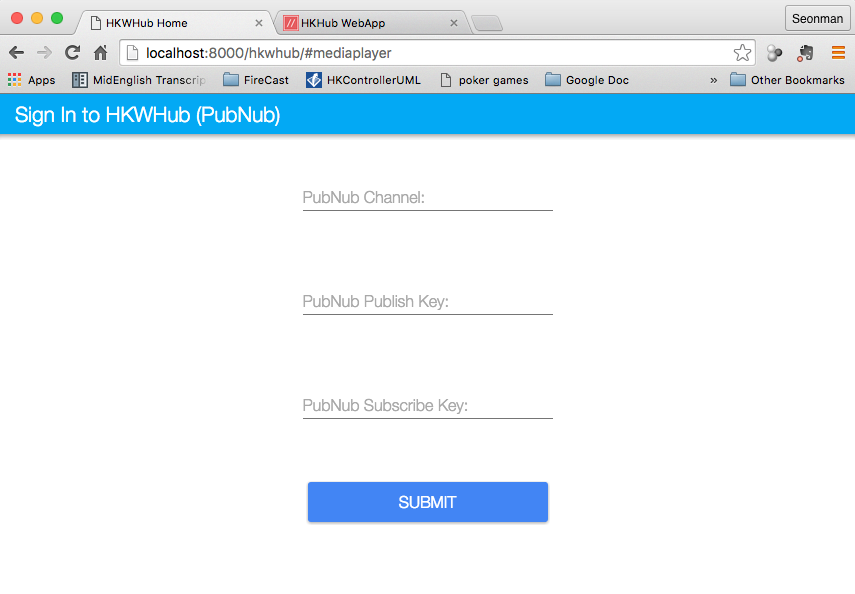
Enter the same PubNub publish key, subscribe key, and channel name that you used for HKWHub app, and click Submit, as below.
https://chrome.google.com/webstore/detail/postman/fhbjgbiflinjbdggehcddcbncdddomop/related?hl=en
If you press Submit, then you will see the first screen like below. This is the list of media items available at the HKWHub app.
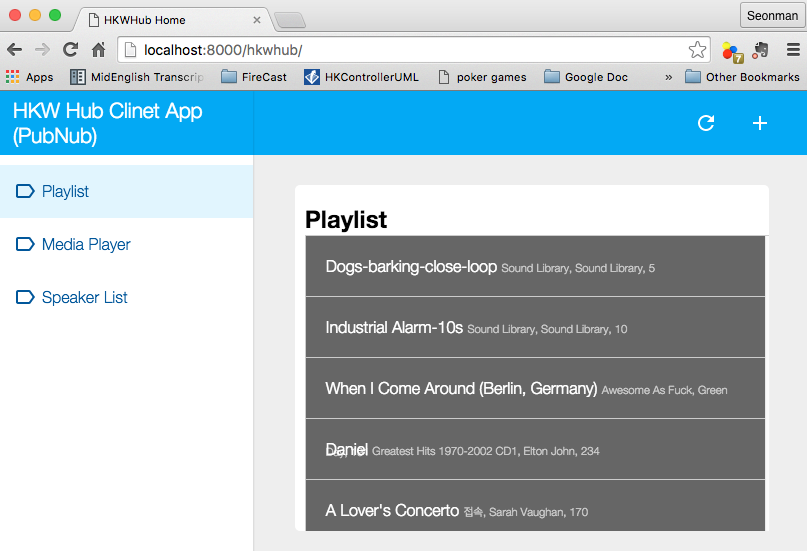
The UI of the Web app is exactly the same as HKIoTCloud web app. So, we skip to explain the rest parts of the app.
Use curl command to send REST requests
We show how to control Omni speakers by sending REST requests to HKIoTCloud. Sending REST requests to Local Server is almost the same.
You can use curl command in your shell to send REST requests.
If you are a chrome browser user, you can use Postman (https://chrome.google.com/webstore/detail/postman/fhbjgbiflinjbdggehcddcbncdddomop/related?hl=en) chrome extension to send HTTP requests with browser-based UI.
Note
Before you do this, do not forget to run HKWHub App and connect to HKIoTCloud..
Get an Access Token and Refresh Token (HKIoTCloud mode only)
In case of HKIoTCloud more, the client should get an access token from the HKIoTCloud to be able to call the REST APIs. HKIoTCloud supports two authorization modes: password and authorization code. For mode detailed information, please refer to the section of OAuth2 Authorization API Specification.
With password grant mode, you can get an access token and a refresh token as shown below:
- curl -X POST -H “Authorization: Basic bjdIaGlUbktZakpkNHptTTpBTlJmQjl6OTR4dGN4RkdYcmQ1WEhYRWlLZzQzVVk=” -d “grant_type=password&username=yyy&password=xxx” http://hkiotcloud.azurewebsites.net/oauth/token
Result:
{"token_type":"bearer",
 "access_token":"15c0507f3a550d7a31f7af5dc45e4dd9fd9f4bc8",
 "expires_in":3600,
 "refresh_token":"1b470edc539681803de95c919bc3779acdf34e01"}
When you call the HKIoTCloud API calls, you should pass the value of the access token into the request header. Specifically, create an Authorization header and give it the value Bearer <access token>.
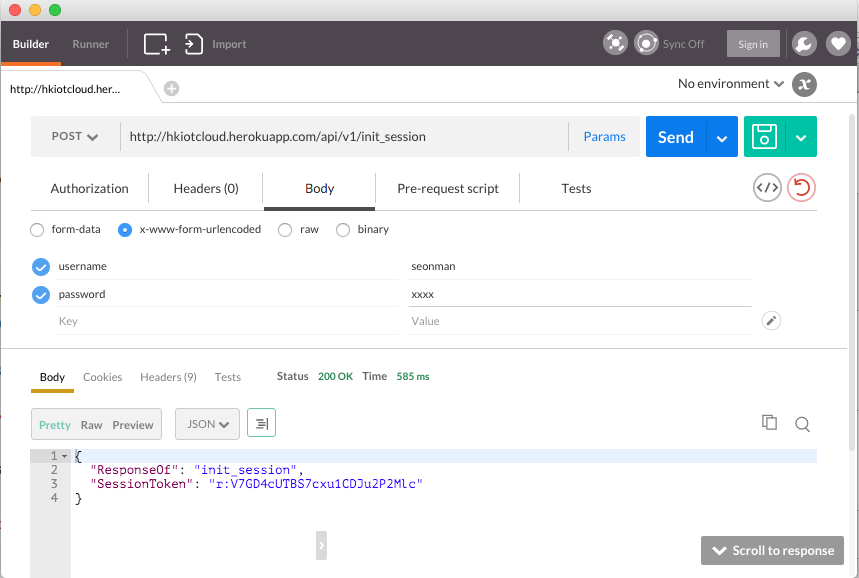
a. Init session
- curl -H “Authorization: Bearer 15c0507f3a550d7a31f7af5dc45e4dd9fd9f4bc8” http://hkiotcloud.azurewebsites.net/api/v1/init_session
This returns the SessionToken. The returned SessionToken is used by all subsequent REST API request in the body.
{"ResponseOf":"init_session","SessionToken":"r:abciKaTbUgdpQFuvYtgMm0FRh"}
b. Add alls speaker to session
After HKWHub app is launched, none of speakers is selected for playback. You need to add one or more speakers to play audio. To add all speakers to playback session, use set_party_mode. Party Mode is the mode where all speakers are playing the same audio together with synchronization. So, by set_party_mode, you can select all speakers to play.
- curl -H “Authorization: Bearer 15c0507f3a550d7a31f7af5dc45e4dd9fd9f4bc8” “http://hkiotcloud.azurewebsites.net/api/v1/set_party_mode?SessionToken=r:abciKaTbUgdpQFuvYtgMm0FRh“
{"Result":"true","ResponseOf":"set_party_mode"}
c. Get the list of speakers available
To control speakers individually, you can get the list of speakers available by using device_list command.
- curl -H “Authorization: Bearer 15c0507f3a550d7a31f7af5dc45e4dd9fd9f4bc8” “http://hkiotcloud.azurewebsites.net/api/v1/device_list?SessionToken=r:abciKaTbUgdpQFuvYtgMm0FRh“
{"DeviceList":[
        {
                "IsPlaying":false,
                "MacAddress":"",
                "GroupName":"Garage",
                "Role":21,
                "Version":"0.1.6.2",
                "Port":44055,
                "Active":true,
                "GroupID":"4625984469",
                "ModelName":"Omni Adapt",
                "DeviceID":"4625984469168",
                "IPAddress":"10.0.1.6",
                "Volume":17,
                "DeviceName":"Adapt",
                "WifiSignalStrength":-62
        },
        {
                "IsPlaying":false,
                "MacAddress":"b0:38:29:11:19:54",
                "GroupName":"Living Room",
                "Role":21,
                "Version":"0.1.6.2",
                "Port":44055,
                "Active":true,
                "GroupID":"9246663882",
                "ModelName":"Omni 10",
                "DeviceID":"92466638829744",
                "IPAddress":"10.0.1.9",
                "Volume":17,
                "DeviceName":"Omni Left",
                "WifiSignalStrength":-67
        }
],
"ResponseOf":"device_list"
}
d. Add a speaker to session
If you want to add a speaker to session, use add_device_to_session`. It requires ``DeviceID parameter to identify a speaker to add. This command does not impact other speakers regardless of their status.
- curl -H “Authorization: Bearer 15c0507f3a550d7a31f7af5dc45e4dd9fd9f4bc8” “http://hkiotcloud.azurewebsites.net/api/v1/add_device_to_session?SessionToken=r:abciKaTbUgdpQFuvYtgMm0FRh&DeviceID=4625984469168“
{"Result":"true","ResponseOf":"add_device_to_session"}
e. Get the media list
- curl -H “Authorization: Bearer 15c0507f3a550d7a31f7af5dc45e4dd9fd9f4bc8” “http://hkiotcloud.azurewebsites.net/api/v1/media_list?SessionToken=r:abciKaTbUgdpQFuvYtgMm0FRh“
Here, SessionToken should be the session token you got from init_session. You will get a list of media in JSON like below
{"MediaList": [
        {"PersistentID":"7387446959931482519",
        "Title":"I Will Run To You",
        "Artist":"Hillsong",
        "Duration":436,
        "AlbumTitle":"Simply Worship"
        },
        {"PersistentID":"5829171347867182746",
        "Title":"I'm Yours [ORIGINAL DEMO]",
        "Artist":"Jason Mraz",
        "Duration":257,
        "AlbumTitle":"Wordplay [SINGLE EP]"}
]}
f. Play a media item listed in the HKWHub app
If you want to play a media item listed in the HKWHub app, use play_hub_media by specifying the media item with PersistentID. The PersistentID is available from the response of media_list command.
Note
Note that, before calling play_hub_media, at least one or more speakers must be selected (added to session) in advance. If not, then the playback will fail.
- curl -H “Authorization: Bearer 15c0507f3a550d7a31f7af5dc45e4dd9fd9f4bc8” “http://hkiotcloud.azurewebsites.net/api/v1/play_hub_media?SessionToken=r:abciKaTbUgdpQFuvYtgMm0FRh&PersistentID=1062764963669236741“
{"Result":"true","ResponseOf":"play_hub_media"}
f. Play a media item in the HKWHub by specifying a speaker list to play
You can play a media item in the HKWHub app by specifying the list of speakers.
- curl -H “Authorization: Bearer 15c0507f3a550d7a31f7af5dc45e4dd9fd9f4bc8” “http://hkiotcloud.azurewebsites.net/api/v1/play_hub_media_selected_speakers?SessionToken=r:abciKaTbUgdpQFuvYtgMm0FRh&PersistentID=1062764963669236741&DeviceIDList=34317244381360,129321920968880“
The list of speakers are listed by the parameter DeviceIDList with delimitor ”,”.
{"Result":"true","ResponseOf":"play_hub_media_selected_speakers"}
g. Play a HTTP streaming media as party mode
- curl -H “Authorization: Bearer 15c0507f3a550d7a31f7af5dc45e4dd9fd9f4bc8” “http://hkiotcloud.azurewebsites.net/api/v1/play_web_media_party_mode?SessionToken=r:abciKaTbUgdpQFuvYtgMm0FRh&MediaUrl=http://seonman.github.io/music/hyolyn.mp3“
{"Result":"true","ResponseOf":"play_web_media_party_mode"}
h. Stop playing
- curl -H “Authorization: Bearer 15c0507f3a550d7a31f7af5dc45e4dd9fd9f4bc8” “http://hkiotcloud.azurewebsites.net/api/v1/stop_play?SessionToken=r:abciKaTbUgdpQFuvYtgMm0FRh“
{"Result":"true","ResponseOf":"stop_play"}
i. Set Volume
- curl -H “Authorization: Bearer 15c0507f3a550d7a31f7af5dc45e4dd9fd9f4bc8” “http://hkiotcloud.azurewebsites.net/api/v1/set_volume?SessionToken=r:abciKaTbUgdpQFuvYtgMm0FRh&Volume=30“
{"Result":"true","ResponseOf":"set_volume"}
Note
Please see the REST API specification for more information and examples.